The Print Center is now offering PrintNet ordering and billing software to the campus community. With this software you will not only order print jobs but you will also order blank paper, St. Olaf stationary items, business cards, and wide format printing. Name badges, notecards, notepads and white case paper for delivery will still be ordered through the links on our web page.
PrintNet Features:
- Order history, and job status updates
- File storage
- Estimates and final pricing printed on invoices
- Account specific reports
- Automatic file conversion to PDF from many applications
- Reorder previous jobs though job history
- Digital File is required for all print orders
- Order blank paper and other supplies
- Order St. Olaf Business Cards
Please note that white copier paper delivery, name badges, and notecards are NOT ordered through PrintNet.
We are excited that PrintNet will have the functionality to provide cost estimates for customers on all of their print orders and other miscellaneous supply orders. Please note that occasionally the price estimates may need to be adjusted, especially on items such as booklets or mixed color with black and white printing. Pricing adjustments will be made on orders requiring them and final billing will be accurate before charges are made to an account. Final billing will be printed on all invoices for your convenience.
Along with pricing you will have records of all your previous orders and file storage for future as well as past orders. Another convenience will be automatic conversion to PDF on many file formats. You will also see a jobs progress in your jobs tab. Once a job is finished it will be marked as closed and will be ready for pickup. You will also have to option of easily ordering a previous job from your job list by simply clicking copy.
Registering your account
When placing an order for the first time using PrintNet you will be directed to register your account. The following information is needed to create your account:
- Customer type – Choose the appropriate account type:
- St. Olaf Faculty/Staff
- St. Olaf Student (students use this customer type even if paying with cash)
- Off Campus/CASH (use this for off campus/non stolaf.edu email registration only)
- Name
- Password (Faculty, staff and students use your St. Olaf password)
- Address
- Phone
- Department (enter your St. Olaf department/office, student org/club, or CASH)
- Account number. No sub-account. These can be added on the ordering page. Put in your most frequently used number. You can change this on a work order as needed.
- Cash accounts use 000-00001 or 000-00002 for non-taxable accounts.
 PrintNet ordering and billing software does require a digital file and will auto convert many document types to PDF. If you only have a printed out original it will need to be scanned and saved as a PDF. We can help with that process if you are unable to do this in your department. All incoming print center printing and supply orders must go through PrintNet for processing and billing. Email orders will not be accepted.
Sending a Print Order
Follow these step by step instructions for submitting a print order:
- Click Print Orders from the landing page
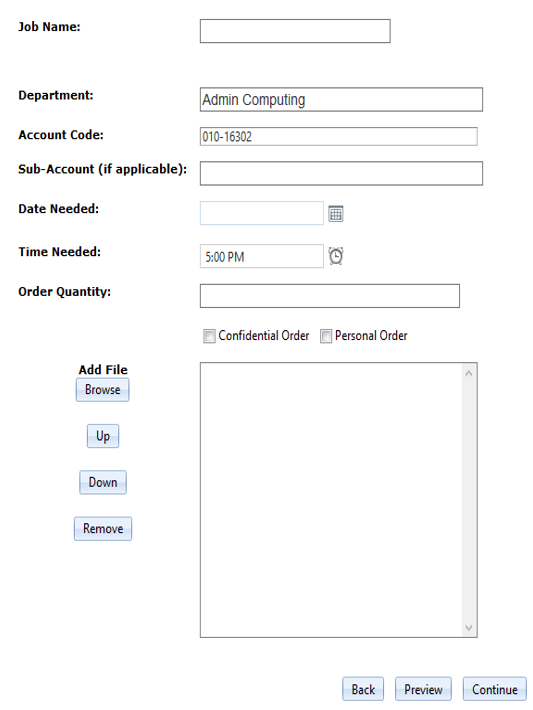
- Job name: choose a name to identify the job (e.g., Jazz concert program)
- Department: will auto fill, you can change it
- Account code: will auto fill, you can change it
- Sub-Account: enter a sub account, if desired
- Date Needed: select the date you need the order
- Time needed: select a time, if desired
- Order Quantity: enter how many copies/sets you need
- Add File: upload your file
- Select Browse on the left under add file
- Click Add on the bottom of the file screen

- Click Select on the Upload New File screen

- Browse for your file
- Select and open
- Click Upload. The file will now appear at the top of your list of files
- Now click Select next to the file you wish to print. The file is now placed in the work order
- You can upload multiple files to a work order
- B/W or Color: choose black and white print, color print or per original (mixed black and color)
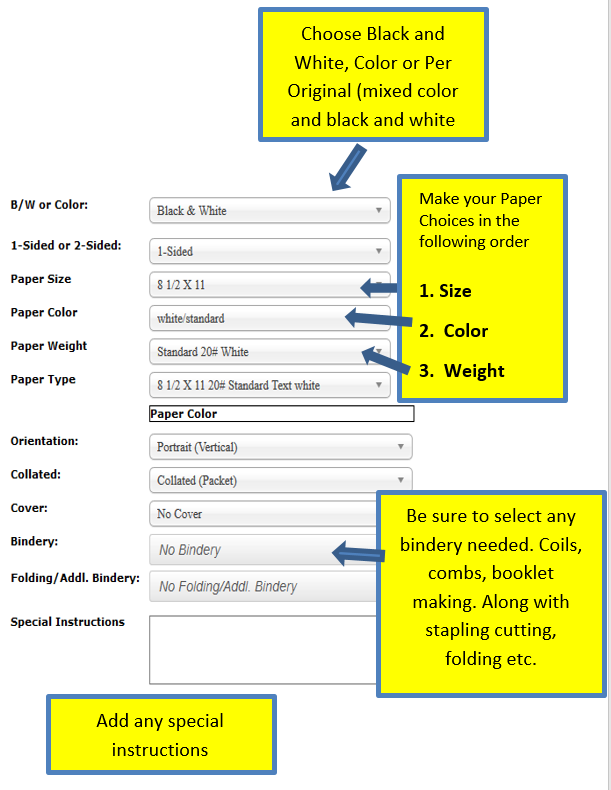
- 1-Sided or 2-Sided: do you want printing on both sides or one side only?
- Paper Size: choose the size of paper you want your copies on
- Paper Color: choose the paper color for your order. You must choose a color to advance. White standard is default
- Paper Weight: choose from the available weights for your paper color. 20# white is the default
- Paper Type: this field will auto fill based on your paper color and weight choice
- Orientation: choose portrait or landscape. This field is not required and has no effect on the job
- Collated: choose collated or uncollated
- Cover: select a cover, if needed, for you order
- Bindery: here you’ll order stapling, 3-hole punching, cutting, comb or coil binding among other things. If binding is required you must select Coil or Comb here even if you’ve already ordered a cover for your coil or comb binding.
- Folding/Addl Bindery: this is where you will order folding and booklet making as well as laminating. If a folded booklet is needed you must select it here even if you’ve already ordered a cover for your booklet.
- Special Instructions: give any instruction about your order
- If your order is complete, select Continue on the bottom
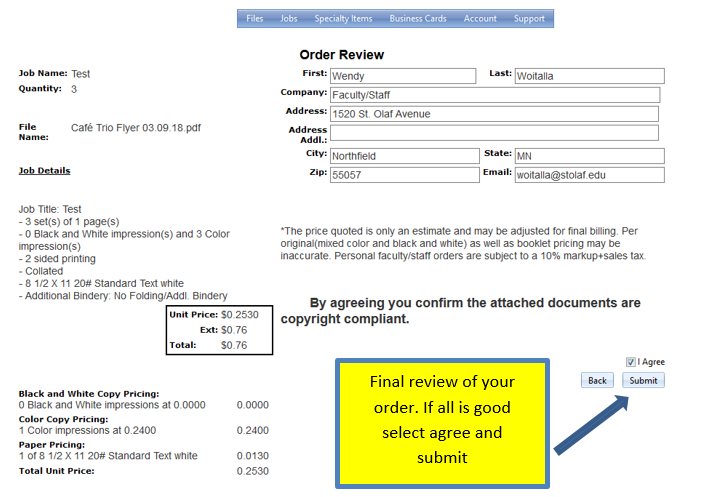
- You will now see a summary of your order as well as pricing. Pricing is an estimate only and may be adjusted for final billing. If your order looks good, agree to the terms and Submit.
Checking Status and Reordering
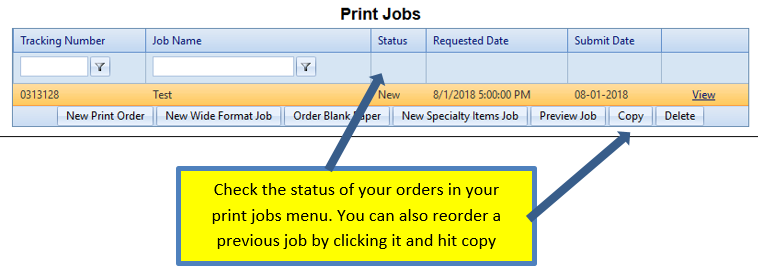
You can check the status of your orders by clicking Jobs in the top toolbar. From this screen, you can also reorder a previous job by clicking it and then clicking Copy. It will allow you to upload a new file or files, if desired, while keeping all other order information the same.

 Ordering Specialty Items
You will order St. Olaf stationary items and other generic items we sell in the Print Center in specialty items. All specialty items will have to be ordered using PrintNet. Departmental specific stationary as well name badges and personal notecards will continue to be ordered using our web site and not through PrintNet.
 Follow these step by step instructions for submitting a specialty item order.
- Job Name: choose a name to identify the order. For example: Envelope order
- Department: will auto fill, you can change it
- Account Code: will auto fill, you can change it
- Sub-Account: enter a sub account, if desired
- Date Needed: select the date you need the order
- Time Needed: select a time, if desired
- Qty: enter how many of the item you need
- Add File: not needed for this order page
- Specialty Item: select your item from the drop down list
- Select Continue
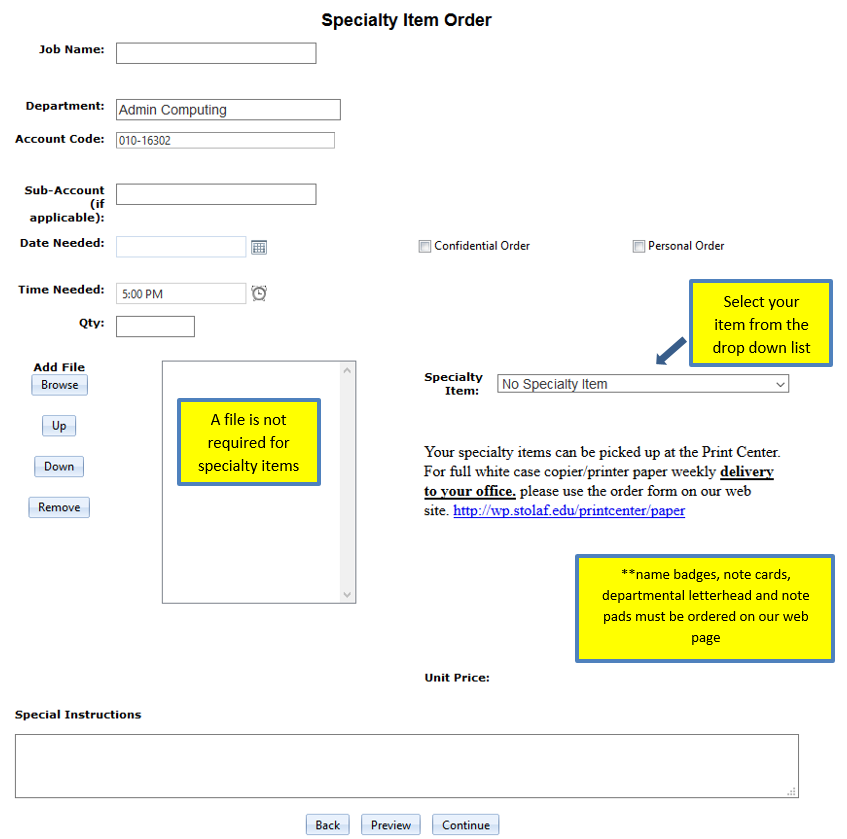
- Your will now see a summary of your order as well as pricing. Pricing is an estimate only and may be adjusted for final billing. If your order looks good, agree to the terms and Submit
- When ordering multiple items, a new order is required for each
Ordering Blank Paper
Here is where you will order blank paper supplies. All requests for blank paper will need to have an order created before picking up paper supplies from the Print Center. White case paper delivery will continue to be ordered on our web page and not in PrintNet.
Follow these step by step instructions for submitting a blank paper order.
- Job name: choose a name to identify the job. For example: Blue paper order
- Department: will auto fill, you can change it
- Account Code: will auto fill, you can change it
- Sub-Account: enter a sub account, if desired
- Date Needed: select the date you need the order
- Time Needed: select a time, if desired
- Paper Size: choose the paper size you are ordering
- Paper Color: choose the paper color
- Paper Weight: choose from the weight available based on the size and color selected
- Qty: enter the number of sheets, reams or cases
- Give any special instructions and select continue
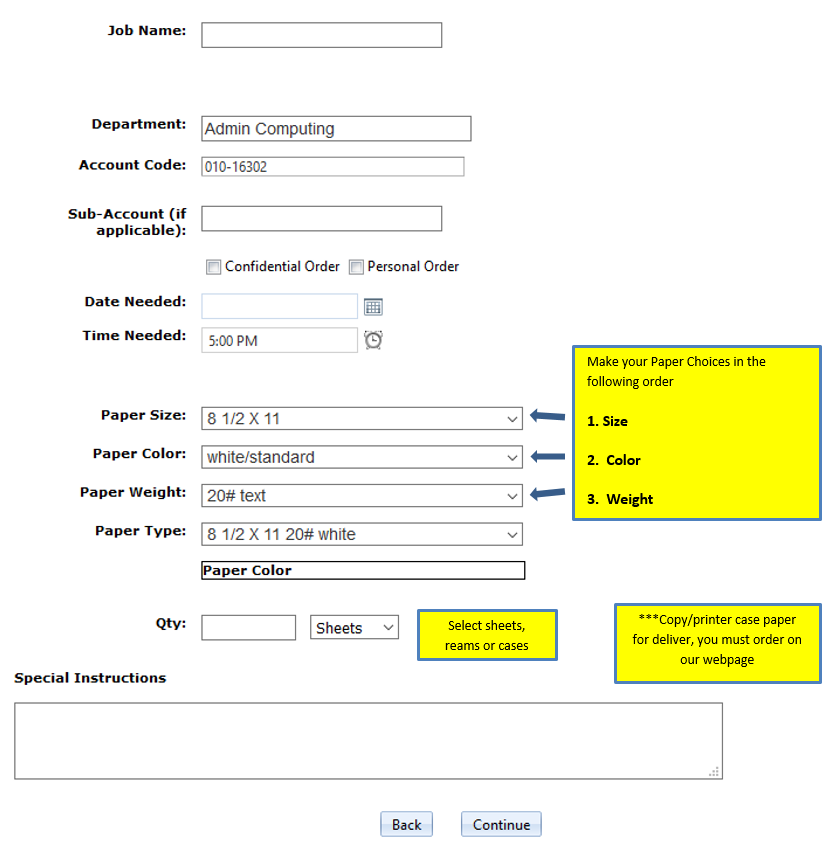
- Your will now see a summary of your order as well as pricing. Pricing is an estimate only and may be adjusted for final billing. If your order looks good agree to the terms and Submit
- When ordering multiple items, a new order is required for each
Wide Format Printing
Follow these step by step instructions for submitting a wide format poster order.
- Job Name: choose a name to identify the job. For example: Large Concert Poster
- Department: will auto fill, you can change it
- Account Code: will auto fill, you can change it
- Sub-Account: enter a sub account, if desired
- Date Needed: select the date you need the order
- Time Needed: select a time, if desired
- Qty: enter how many copies/sets you need
- Add File: upload your file
- Select Browse on the left under add file
- Click Add on the bottom of the file screen

- Click Select on the Upload New File screen

- Browse for your file
- Select and open
- Click Upload. The file will now appear at the top of your list of files
- Now click Select next to the file you wish to print. The file is now placed in the work order
- You can upload multiple files to a work order
- B/W or Color: choose black and white or color
- Ink & Resolution: select Standard
- Select Media: choose from standard, satin photo, 8 mil poly, or foam core
- Original File Size: the size of your poster will auto fill here. If it’s the size you need, you are set
- Magnification %: if you know the percentage you’d like for you poster you can enter it here. It’s not required. If you enter a percentage it will autofill the next field
- File Resize Dimensions: enter the size you would like your poster. If you enter a size it will autofill the magnification field
- Special Instructions: give any instruction about your order.
- If your order is complete, select Continue
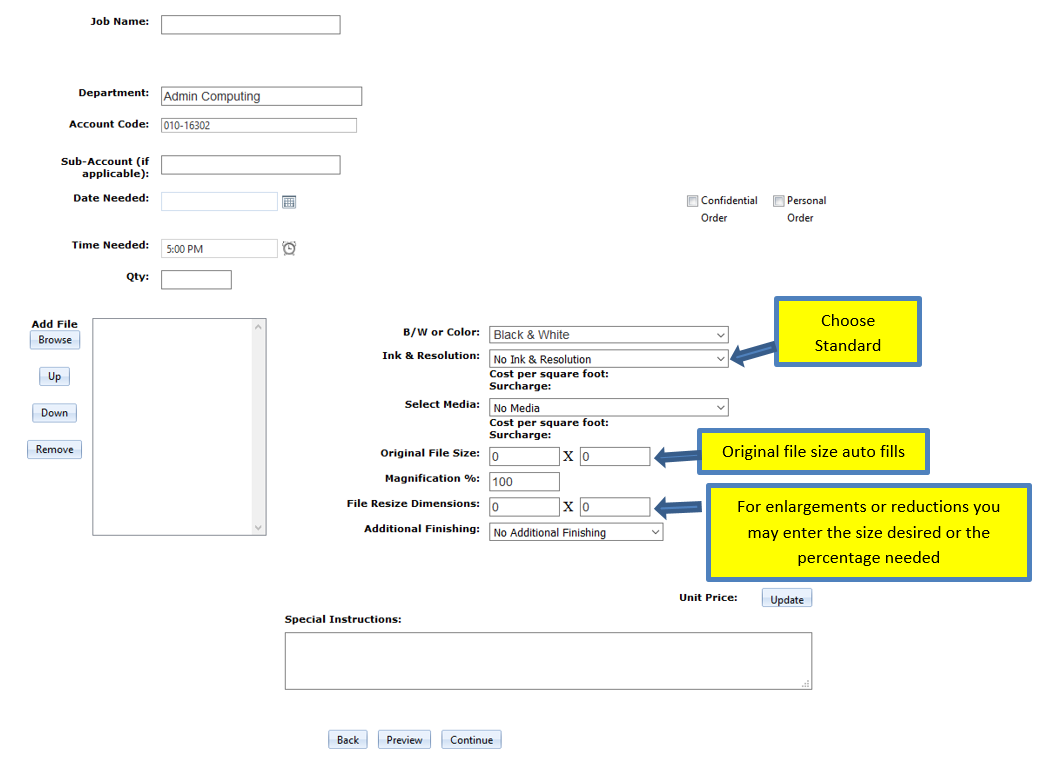
- Your will now see a summary of your order as well as pricing. Pricing is an estimate only and may be adjusted for final billing. If your order looks good, agree to the terms and Submit
Business Card Orders
Follow these step by step instructions for submitting a business card order.
- Choose the business card design most suited for your individual card requirements, then click Next

- Name: enter your full name, just how it should appear on your card
- St. Olaf Graduating Year: last 2 digits (optional)
- Title: enter your official St. Olaf title and any credentials you have
- Enter your phone numbers, as appropriate
- Email: enter your St. Olaf email address
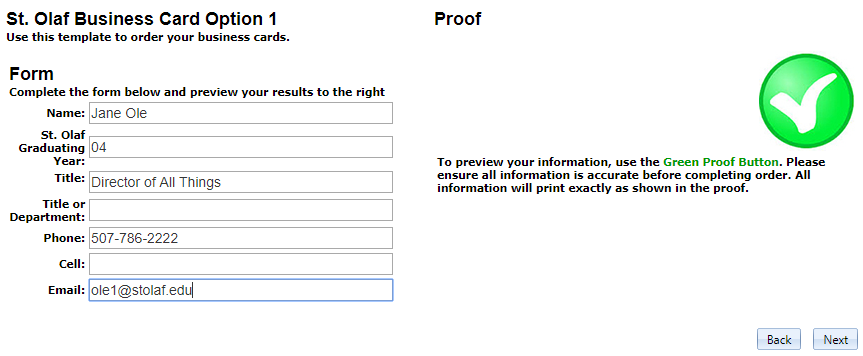
- You can view a proof of your card design and if everything looks good, click Next. Some adjustments may be made on your card to comply with business card formatting standards
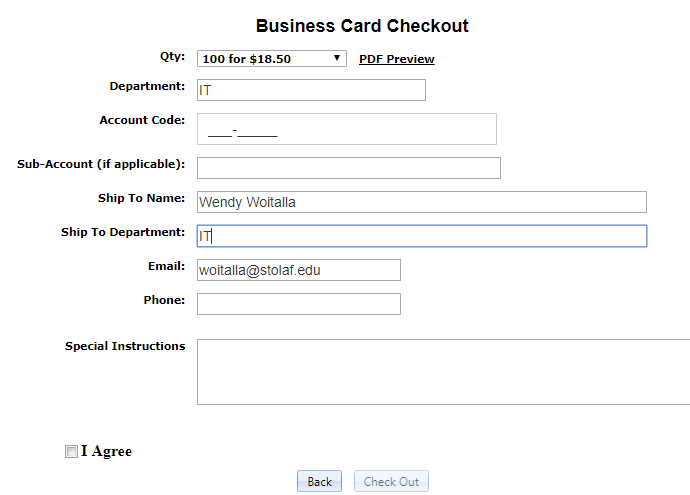
- Qty: select your quantity
- Department: enter your department if it did not autofill
- Account Code: will auto fill, you can change it
- Sub-Account: enter a sub account, if desired
- Enter where the cards should be shipped and any special instructions
- If your order looks good agree to the terms and click Check Out


You must be logged in to post a comment.