Preparing your 2D Work to Document
All work should be unframed and canvases will need hanging wire on the back. There are two options for hanging in the media room; affixing the work to the wall with a removable adhesive (acceptable for works on paper) or a single 50lb capacity floreat nail. NO NAILS OR ADDITIONAL SCREWS ARE ALLOWED IN THE WALLS OF THE LIGHTING STUDIO.
Documenting 2D Work:
First you will need to check your camera’s settings. Remember you can size an image down later, but not the other way around. Make sure that the camera is securely attached to the tripod and be aware of where the lights and camera are in relation to yourself at all times.
Regardless of what kind of lights you’re using (whether they’re the studio lights here at school or if you’re going to DIY at home) you want your lights to be of equal power, the same temperature/color of light, softened or diffused, and equally spaced to create a soft and even light.
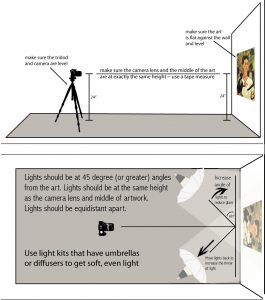
The ideal set-up is to use a pair of Omni lights with umbrellas, at equal height and at a 45-degree angle to the work.
- For a smooth running shoot, always make sure that the work is arranged from smallest to largest and that you shoot in this order too. It will prevent you from making major adjustments repeatedly
- Always do a test (paper test at the midline) to make sure that the lights are appropriately placed. (see image below)
- Always shoot each piece more than once
- Make sure the camera is level to the mid point of the piece. Make sure the bottom of the camera is parallel to the floor and not tilted up or down.
- Always use more than one lighting configuration for each piece
- Always let the media room attendant adjust the lights for you
- Make sure that the bottom of your piece is parallel to the bottom of the camera viewer
- Download your images immediately after the shoot
- Return all checked out equipment
- Clean up and remove all artwork from the Media Room
Set up lights to be equidistant apart, at 45 degrees, or greater, from the artwork. Increase the degree of light (moving the light closer toward the wall with your artwork if you’re having issues with glare on your work). If you are having issues with “hot spots”, keeping the same degree of angle, move the lights back to broaden the light’s throw.
Lighting Test
To test that your work is properly lit, hold a piece of paper at the center point of the piece. You should have equal shadows, in bother size and shade, on each side of the paper.

Camera Placement
Set up a tripod and camera with the lens at the same center point as your artwork.

Final Documented Image
For 2D work it is recommended that you crop the work down so that the end product you have has no background showing.

